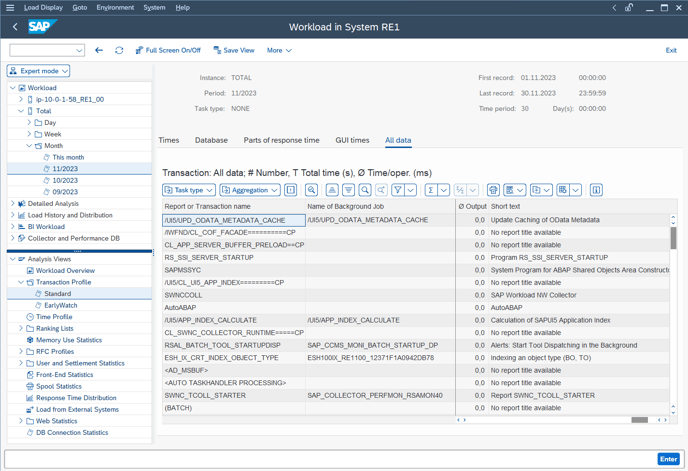
ST03N data will give you insight into your usage of SAP and help you understand which business processes to focus on
ST03N data will need to be exported from the production SAP system.-
Log on to your production SAP system(s).
-
Execute transaction ST03N.
-
In the Navigation tree, select Expert Mode.
-
In the Expert Mode tree, select Workload > <Production SAP Server Name>.
-
Open the Total branch and the Day, Week, and Month folders appear.
-
For each month, open the Month folder and double-click on the last full month.
The Analysis Views tree window appears.
-
In the Analysis Views tree, open the Transaction Profile branch.
-
Double-click on the Standard sub-branch.
The Transaction Profile screen appears.
-
In the Times tab, click the Task Type button and ensure that All is selected.
- Click the All data tab and then export the data as described in the Exporting the data section later in this article.

To additionally export Fiori related data you can perform the following steps:
- In the Analysis Views tree, open the Load from External Systems branch.
Entries with an "@" are generally Fiori related. E.g. mdm.cmd.product.maintain@11.7.7 - In the Times tab, click the Task Type button and ensure that All is selected.
-
Click the All data tab and then export the data as described in the Exporting the data section later in this article.
- In the Analysis Views tree, open the HTTP(S) Front-End Statistics branch.
This is available from Kernel version 752 and activated profile parameter icf/accept_front_end_statistic. Fiori apps will look like mdm.md.supplier.manage - In the Times tab, click the Task Type button and ensure that All is selected.
-
Click the All data tab and then export the data as described in the Exporting the data section later in this article.
Notes:
- ST03N has a limited time frame so some transactions that are rarely used but still important like period end closing transactions, etc. will also need to be extracted.
- In ST03N you can extend the retention data to max which is three months:
- ST03N does not collect indirectly called transactions in custom code. This means if custom code makes a call to transaction YXZA, the transaction YXZA is NOT recorded in ST03N. If you use a lot of Z transactions that make these types of calls it is an option to to also activate TCODE SCMON (ABAP Call Monitor) so you can also see these in the ST03N data.
- If data is already gathered you can already use the results, or you can wait until the data collection time is completed for more accurate information. To display the data, start transaction SCMON and click the Display Data button:
Exporting the data
Once you have the data you require you can then export it so it can be loaded into FusionGraph.
- Ensure that the description / short text column is visible so it’s clear what each item refers to.
-
From the toolbar, click the Export button and select Local file.
A dialog box appears asking to select a format that you want the data to be saved.
-
Select Spreadsheet and click the Continue button.
A dialog box appears.
-
If you want to change the directory path, click the Directory Browse button and select the directory where you want to save the file.
-
In the File Name field, type in a name for the file. The file extension must be .XLS.
-
Click Generate.
The file is saved to the selected directory.
Note:
- Sometimes the data that's exported can be very large as there may be many duplicates in the Report or Transaction Name column or the Name of an Application (Fiori) column. If this is the case you can remove all duplicates in Microsoft Excel® before sending the data.
Creating a Microsoft Excel spreadsheet:
After you have generated your file, if it is not already in Microsoft Excel® spreadsheet format you can convert it as follows:
-
Double-click on the ST03N file that you created.
-
Microsoft Excel opens with a warning message. Click Yes.
-
In Microsoft Excel, select File > Save As.
-
Browse to the directory where you want to save the file.
-
Save the updated file with an Microsoft Excel Workbook (.XLSX) file extension.
-
Click Save.
The ST03N file is now ready to be uploaded into FusionGraph.
Please repeat these steps for each month of usage data that is available so we can gain as much data as possible.
.png?height=120&name=fusion-graph-white%20(1).png)